Sunday, April 29, 2018

Lower unit repairs


When I opened the water pump housing I managed to break three bolts of total four.
I was not event using extensive force, several years of maritime use had locked the bolts badly.

It was quite hard to get the part number 84 out due broken bolts. I finally managed to get it out but unfortunately a small piece of exhaust pipe wall broke also.

In order to repair the lower unit I need to get three 6 mm bolts out and fix the exhaust pipe wall.


Broken water pump bolts and a missing piece from the exhaust pipe.


How hard can it be to remove broken bolts from outboard lower unit ? Quite hard indeed!

I tried several methods:
- Put a nut with permanent Loctite, allowed 47 hours to affect => Loctite didn't hold when opening.
- Stud remover was not able to get hold of the broken bolt, there was not enough length in the bolt.
- I tried to drill hole in the bolt and use bolt extractor, it's very hard to drill since the driveshaft is so close, I used a broken bolt extractor but unfortunately it broke also leaving the carbide tip inside the bolt 😭

I was thinking to obtain a Rescue Drill Bit and use it with Dremel but it's not cheap and I guess you need to order it from the US.

I took the lower unit to a local outboard repair workshop, they said that they cannot do anything as they don't have suitable tools (or even interest...). However they recommended an engine machine shop, as I live in the Helsinki capital area in Finland I took the lower unit to GT-Motor Oy

They are certainly not specialized in outboard or boat engines but they said they will give a try,
after a week they informed that bolts were removed successfully and even the threads were intact! Apparently they used welding and one of the bolts gave more resistance than the others.
I'm quite happy with the outcome and can totally recommend their services!

Bolts extracted by engine machine shop!

Now I needed to fix the exhaust pipe and also reinforce the front stud which was quite rusty.
I don't have aluminum welding tools or skills so I decided to use Loctite Power Epoxy Metal.


The end result does not look fancy but I think it's quite strong and can also withstand the temperature of the exhaust gases.


Exhaust pipe wall fix using epoxy.
Exhaust pipe from other side.


Saturday, April 21, 2018

Model confusion

It was time to do some spring maintenance, the ouboard is running quite roughly in lower rpms so I decided to clean the carburetors.

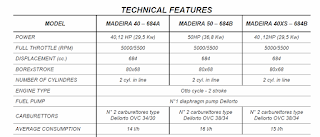
For my big surprise I noticed that the carburetor model in my outboard is Dellorto OVC 34/30. According to the Selva parts listing Madeira 40 XS should have bigger Dellorto OVC 38/34 carburetors!

My engine cover says 40 XS, as I'm not the first owner of the motor I cannot say for sure if the cover has been changed, highly doubt that. The sticker on the engine states just "MADEIRA" and model is number is 684A. This model number is a little confusing as Madeira 40 model number is S650 and Madeira 40 XS model number is S650D.

Previously when I tried to remove the exhaust separator plate it was not there. I'm starting to think this outboard is Madeira 40 and not Madeira 40 XS. I emailed a question to Selva factory but no answer yet.

Madeira 40 XS should not have Dellorto OVC 34/30 carburetors!

Specs from document "Selva Parts F - MADEIRA 2002-2003.pdf"

Sticker says 40 XS

Sticker on engine says MADEIRA 684A
Some updates:

I found this document which describes Selva Madeira models 2007-2008. Selva has changed model numbers for Madeira outboard possibly already in 2005. So model 684A is Madeira 40, Madeira 40 XS is 684B. That makes me a little sad, need to update the description of this blog!

I'll continue to investigate the differences, it seems that one could convert even Madeira 40 to Madeira 50 but it might not be economically reasonable.


Sunday, April 8, 2018

Installing Hill Marine Semi Cleaver propeller (Part 2)

I was trying to find a suitable Michigan Wheel XHS thrust washer with "sharper" teeth so that it would be similar to Selva stock thrust washer but did not find anything from their selection.

I also tried find a way to use Selva stock thrust washer with XHS hub kit but it's not easy since the diameters are different and some adapter rings would be needed!

I have XHS Yamaha thrust washer (part number 991243) and I decided to alter it for better fit.
The thrust washer is made of quite soft metal (brass I suppose) so it's easy to modify even using hand tools. I used a round file to make each tooth a little sharper.

Then I installed the thrust washer and the propeller also and started to tighten the propeller slowly. The thrust washer adapted to the propeller shaft quite nicely and I noticed that propeller was not waggling anymore. When I rotated the propeller it was spinning well and not touching the lower unit. I'm quite happy with the outcome, and will do a follow-up post later how to propeller operates on the water.

The good news is that one can use propellers that are compatible with Michigan Wheels XHS hub kit, there are quite many out there!

XHS Yamaha thrust washer after filing.


Thrust washer installation.


Hill Marine Semi Cleaver on Selva Madeira  40 XS


Monday, April 2, 2018

Opening the water pump


It was time to check the condition of the water pump impeller. I think it has never been changed.
This was supposed to be an easy task, just open four 6 mm bolts and slide the case cover off.

Everything went well until I noticed that three of the four bolts broke when opening!
I did not use extensive force, heard some weird sound but thought that it was the coming from the wrench.

Warning:
Be extra careful when opening the bolts especially if that has not been done for a long time!


The impeller was not in a bad condition but after checking it more carefully I discovered that one of the blades had a clear fracture.

I have ordered new spare parts from Engine Marine Part, I think they have the best selection of Selva parts online and you can even ask non-listed parts to be ordered from Selva.

8095060 Water pump impeller 
3570420 OR ring 56.87 
- 8045220 Pump-tube gasket 
3550190 Grommet 18 x 24 x 4
5565010 Impeller pin  (I don't need to change this one)


The water pump parts I'm planning to replace.

Removing water pump case bolts.

The water pump case removed.

Here you can see the the direction the impeller is turning.

Three broken bolts and one that came out without problems.

Possibly the impeller installed in the factory 2005.

There is a fracture in one of the blades, impeller must be replaced.